
Do you own a WooCommerce store and suffer from cart abandonment? PeachPay is the checkout & payment solution for you!
One of the most important steps to boost sales and conversions is the checkout process. Research shows an average of 70% rate for cart abandonment. 18% of these customers leave store pages because of the checkout process being too complicated or long.
While WooCommerce offers a range of plugins to aid in increasing sales, traffic, and more, we’ve curated our own list of recommended WooCommerce plugins to use, but in this post we’ll be advising you on how to improve your checkout process using PeachPay, the ultimate WooCommerce one-click checkout plugin.
Plus… PeachPay is funded and backed by WooCommerce!
Why use a WooCommerce one-click checkout plugin?
While the default checkout page provided by WooCommerce itself isn’t too bad and it will definitely do the job in processing sales, but between you and a competitor site, the site that offers a simplified checkout is more likely to win! So…
There are a few reasons why we recommend using PeachPay for WooCommerce on your store:
- Reduces the steps to payment, giving your customer less time to abandon the cart.
- Improves your customer experience, making it easy and convenient for your shoppers.
- Saves your customers time, by allowing them to checkout in just a few clicks.
- It’s proven to reduce cart abandonment, as mentioned above.
- It can boost your sales, because customers are more likely to finish their purchase if the checkout process is quick and simple.
How PeachPay will improve your checkout process
As mentioned above… PeachPay simplifies your store checkout process. The PeachPay plugin adds quick checkout buttons on your cart and checkout pages, and also on each product page, meaning your customer can add a product to the cart, and then process payment right then and there!
The following buttons are added to your cart & checkout pages and also your product single pages… Plus you can also edit virtually all aspects of the button: text, color, position, roundedness, icon, etc.
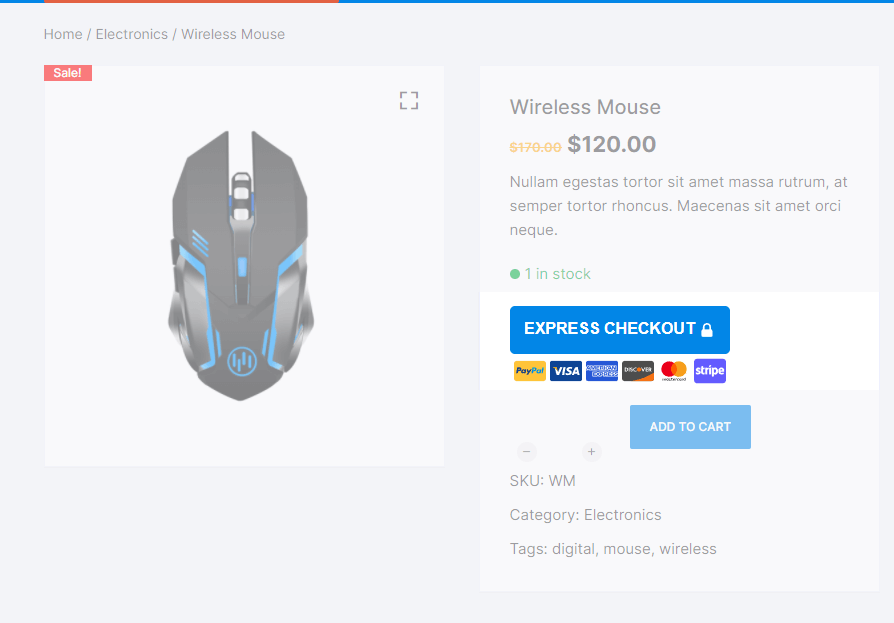
Those buttons make it very quick and easy for your customers to complete their purchase before changing their mind, and simply giving them a better experience on your store.
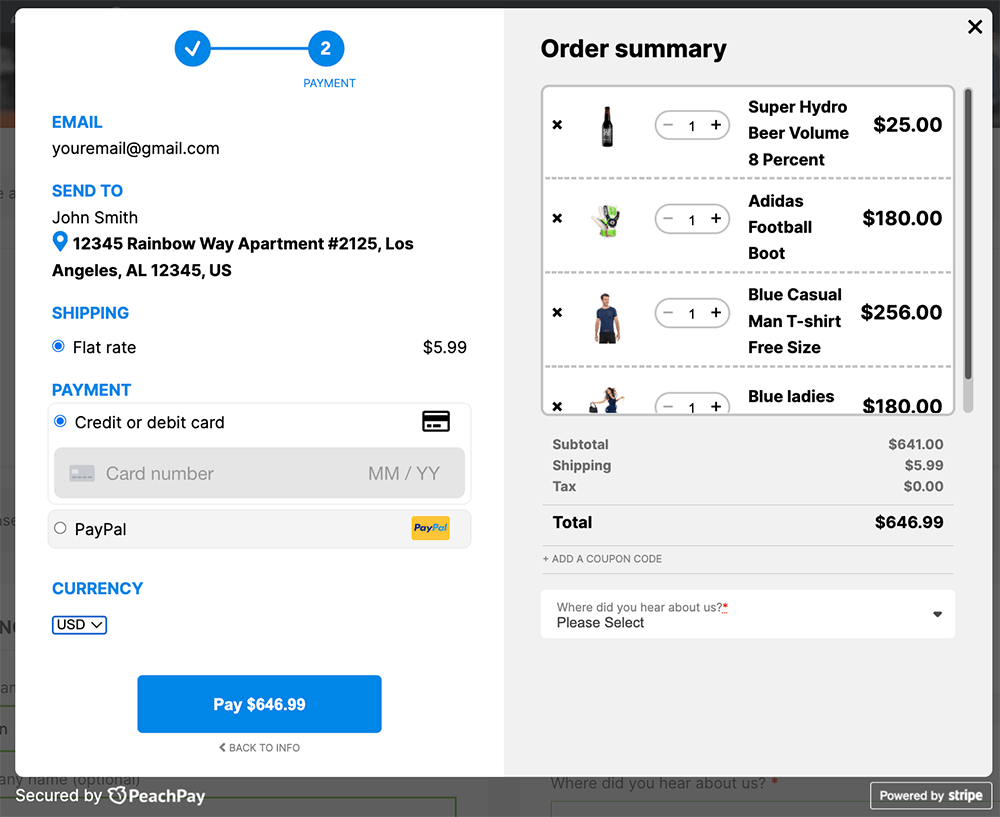
Once a customer is happy with their cart, they’ll click on any of the express checkout buttons to open the express checkout popup where they can enter their details and complete their purchase.
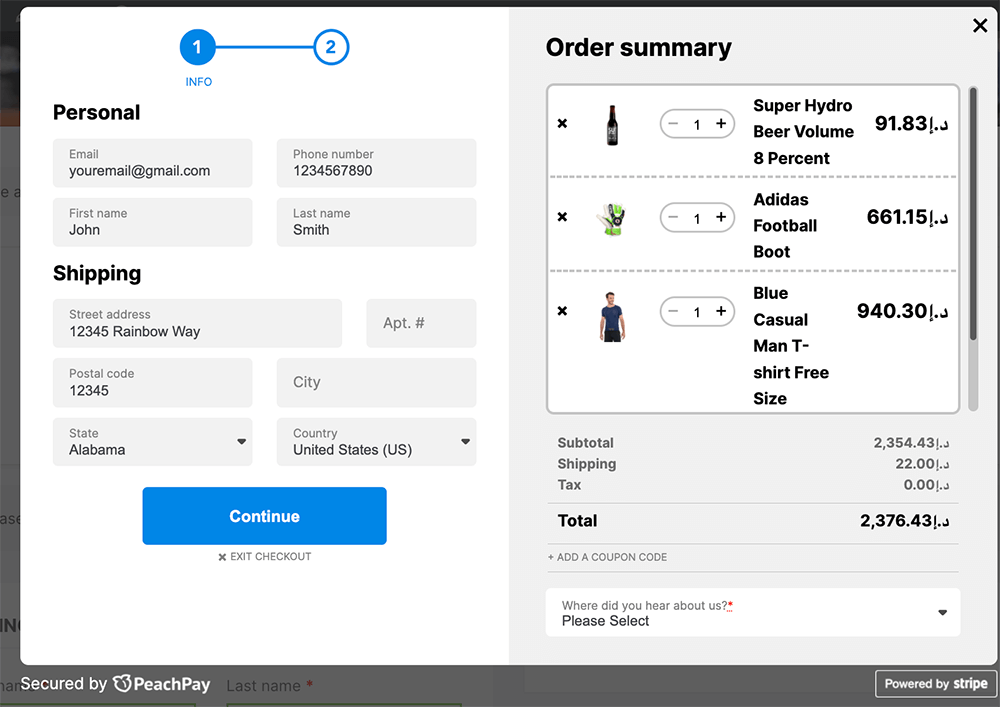
Step 1 is where the customer will enter their Personal details and Shipping address.
PeachPay checkout popup – Step 1 – Enter your details
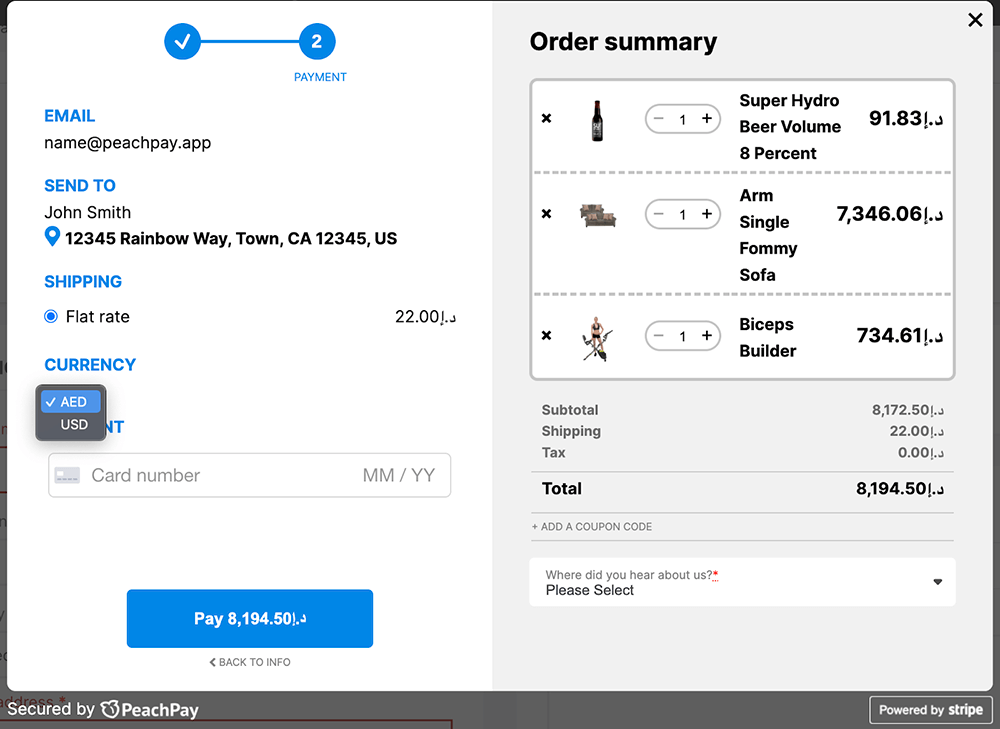
Step 2 is where the customer will enter their Payment details and process the order.
PeachPay for WooCommerce does not handle any payment information. Anything related to payments is handled securely by Stripe, who is their payment processor, and that makes PeachPay’s system PCI compliant.
You will receive all payments in your Stripe account. This will work whether you have an existing Stripe account, or whether you create one just for PeachPay.
Read more below on how to setup and configure the PeachPay for WooCommerce plugin.
Setting up PeachPay on your WooCommerce store
PeachPay make it very easy to install and setup their WooCommerce one-click checkout plugin in just a few minutes.
You simply install the free plugin from the WordPress repository by logging in to your WordPress site and navigating to Dashboard -> Plugins -> Add New.
Then search for “PeachPay for WooCommerce” and you’ll find it come up first in the list… Click Install and the Activate the plugin.
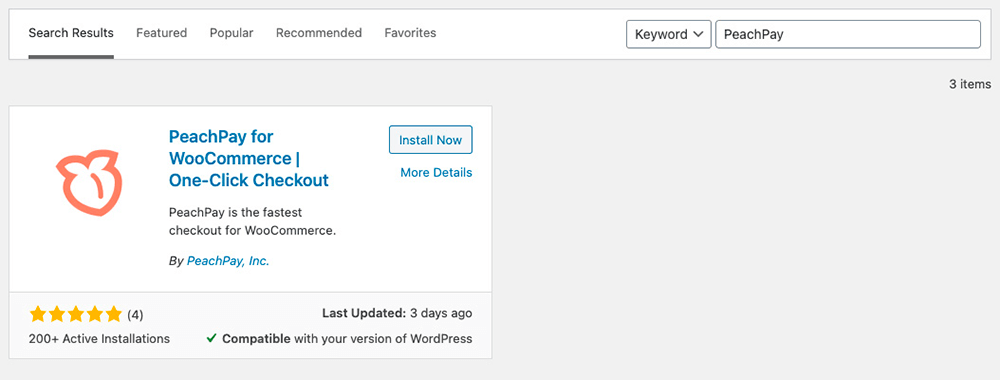
Install Now and Activate the PeachPay for WooCommerce plugin.
After activation, PeachPay will ask if they can connect to your store and have permission to place orders. WooCommerce doesn’t offer the ability to set finer permissions, so you will see it asking for managing products, customers, and coupons too, but the plugin only really needs to be able to place orders.
Once you’ve clicked “Approve”, you will then be taken to Stripe where you can sign up or sign in to a Stripe account.
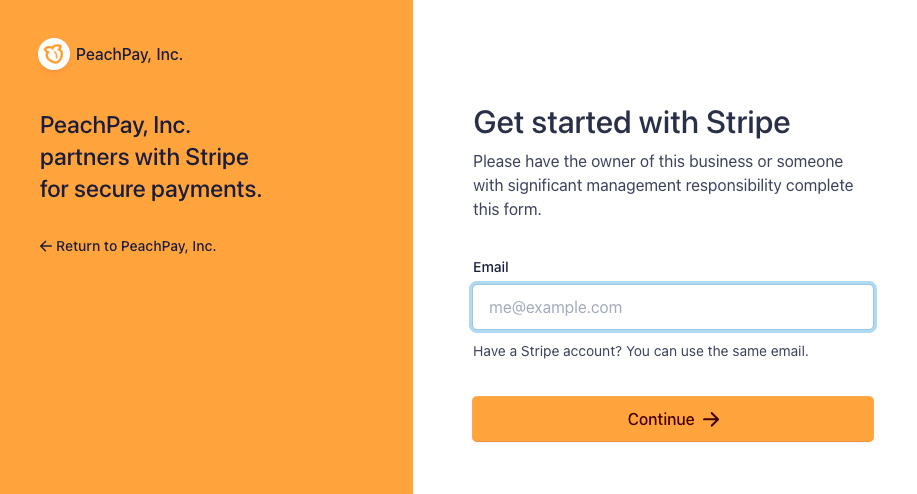
Sign in and connect your stripe account, and then you’re good to go!
You can then configure more payment methods in the PeachPay “Payment methods” settings tab, including PayPal, Apple Pay, Google Pay, Klarna, Afterpay, and more coming soon!
Furthermore, you can also configure other settings such as button text, color, position and more to make PeachPay suit your store in the “Button preferences” settings tab.
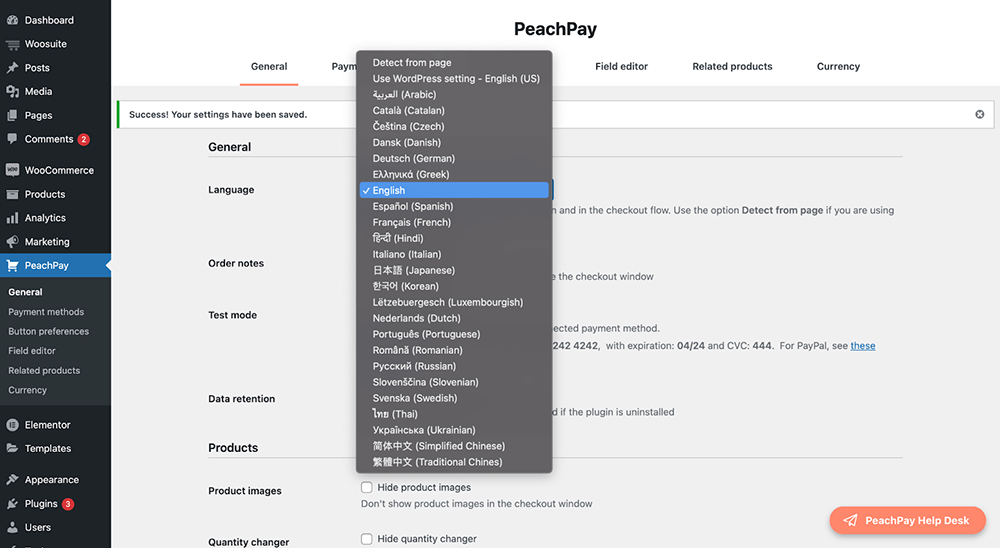
Other settings available in “General” will let you pick your language, show order notes, enable test mode, and more.
The “Related products” settings tab will let you configure a related products gallery in the PeachPay checkout window. Not one to miss out on if you want to increase average order value!
Also check out the “Field editor” settings tab, where you can add, remove, and modify fields that will appear in the checkout process. Navigate to the Field editor tab in the PeachPay Dashboard and then click + Add new field.
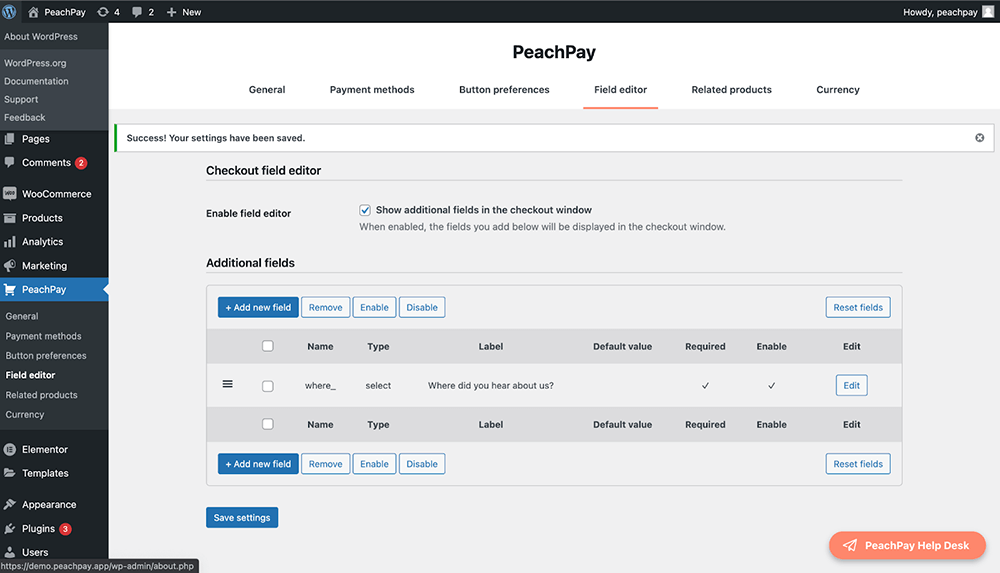
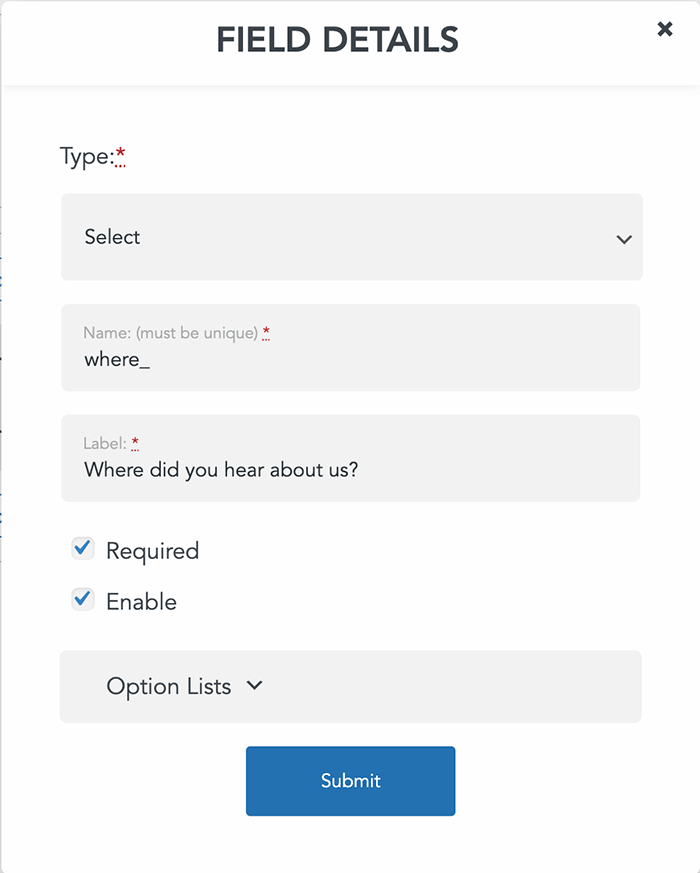
A Field Details window will appear where you can configure your additional field. For example, if you want to find out where your customer heard about you, you can create a Select option, give the field a unique name (not viewable by the customer), create a custom label that will be on the checkout page, and add options under Option List. Make sure you click the required and enabled buttons to be sure that the additional field appears on your page!
Be sure to enable field editor to show in the checkout window.
You will now find the new additional field in the checkout window!
Want to offer different currency options? PeachPay allows you to choose from a multitude of currencies! Go to the Currency tab in the PeachPay dashboard, enable the currency switcher, and select which currencies, conversion rate, conversion rate updates, and decimal places.
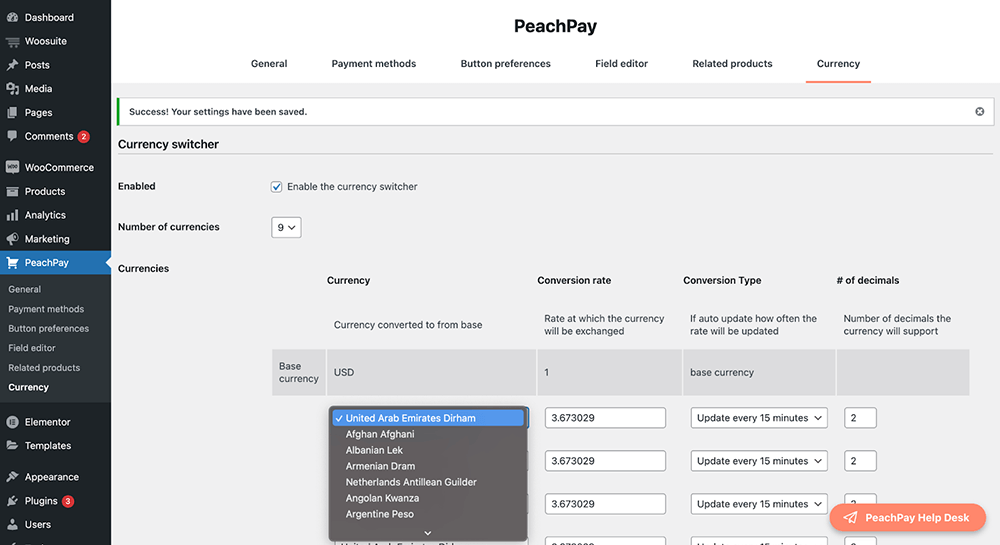
When your customer goes to the checkout page, they will be able to select their currency from a dropdown.
Want to change the language of the button and checkout flow? You can choose from 25+ languages under the General tab of the PeachPay dashboard.
Conclusion
Without a doubt, it’s obvious that a WooCommerce one-click checkout plugin like PeachPay will simplify and reduce the steps in your store sales funnel, and it’s very likely boost your conversion rate and simply make your checkout process more convenient for your customers.
PeachPay supports PayPal, Stripe, Apple Pay, and Google Pay (with more in the works!) To get started with PeachPay, you don’t need to have any technical skills… just download the plugin and let PeachPay do the work!