As a WooCommerce store owner, you will periodically need to import/export WooCommerce data. The most common reasons for this are:
- Exporting customer lists to other websites or marketing platforms
- Sending product information to other sales channels
- Uploading order data to accounting or reporting systems
WooCommerce does have some built-in ability to export products but not customers or orders. And even the built-in product export capabilities are very limited. If you want to perform any of the tasks described above, you’ll likely need one or more plugins.
In this article, we’ll demonstrate the capabilities of WP All Export, one of our recommended WooCommerce plugins, which allows you to export customers, products, and orders using a drag-and-drop interface and sophisticated templates.
How to import/export WooCommerce data:
To follow along, use this convenient sandbox feature and select WooCommerce Store as the demo type.
Exporting WooCommerce Customers
Imagine that you want to send a special offer to customers that have made two or more purchases from you. Here is what you do:
Step 1 – Choose the type of data that you want to export:
- Click All Export – > New Export in the WordPress navigation menu.
- In the New Export screen, choose a post type of WooCommerce Customers:

Notice that you can choose any type of WordPress or WooCommerce data from this selection list, including data from any third-party add-ons or plugins.
Step 2 – Apply filters (optional)
- As soon you select a post type, an Add Filtering Options panel will appear near the bottom of the screen. In this case, we want to select any customers that have placed two or more orders, as follows:
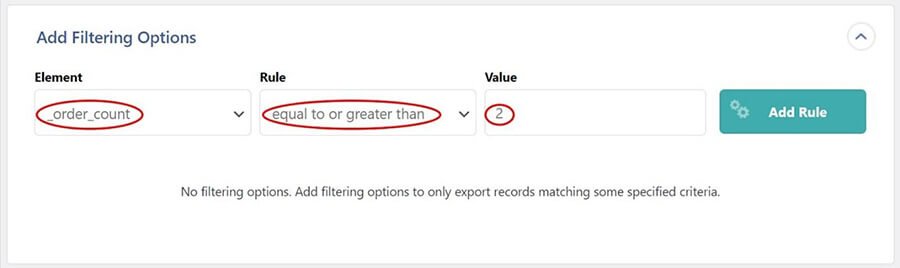
- Click the Add Rule button. When you do this, WP All Export will apply your filter and update the text showing the number of customers that will be exported. In our test data, 8 customers have placed two or more orders.
Step 3 – Select the export columns
- Click the blue Customize Export File button near the bottom of the screen.
- Next up is the Drag and Drop interface. There is an Available Data panel on the right. Expand the Standard option and drag the First Name and Last Name fields into the column selection area.
- In the column selection area, drag the User Login field to the Available Data panel. This will remove that field from the output. Your column selection area should now look like this:
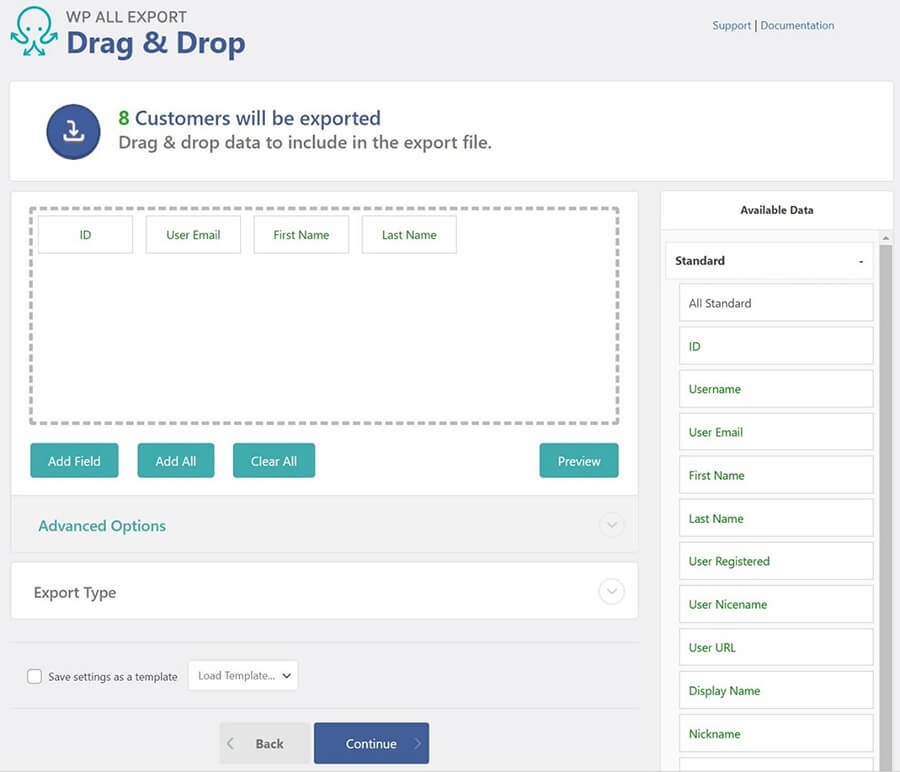
- Note that we’re keeping this export very simple because it is essentially just an email list. However, columns can be added from all the data sources listed in the Available Data panel, freely mixing data from different sources.
Step 4 – Complete the export
- At the bottom of the screen, click the blue Continue button. This will bring you to the Export Settings screen
- On the right-hand side of this screen, click the green Confirm & Run Export button. This will bring you to the Confirm & Run screen.
- When the export is complete, click the blue CSV button in the Click to Download section in the lower half of the screen. This will cause the export file to download.
- Open the downloaded file in your favorite spreadsheet. For this example, we used Microsoft Excel:
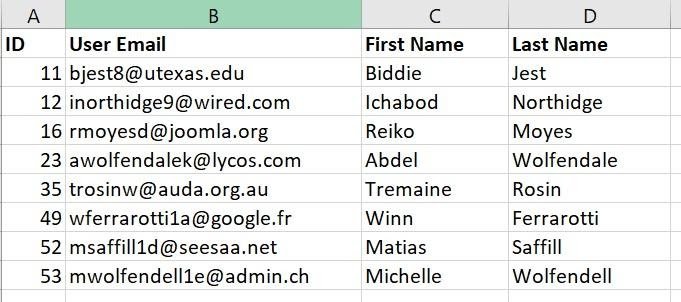
And that’s it — your list of customers with two or more orders!
Now here’s what we love: the core part of this process remains the same no matter what you export with WP All Export, even if it’s an export with custom filters, formulas, etc.
For more information on exporting customers, see Export WooCommerce Customers to XML & CSV.
WooCommerce Product Exports
Products have more export scenarios than either customers or orders. For example, to expand their business, WooCommerce store owners may want to export their product information to other sales channels/platforms.
One export performed by many WooCommerce store owners is to send product information to the Google Merchant Center. For those who don’t know, the Google Merchant Center allows sellers to manage how their products will appear in Google search results.
To perform this type of export, create another new export and select an export post type of WooCommerce Products:
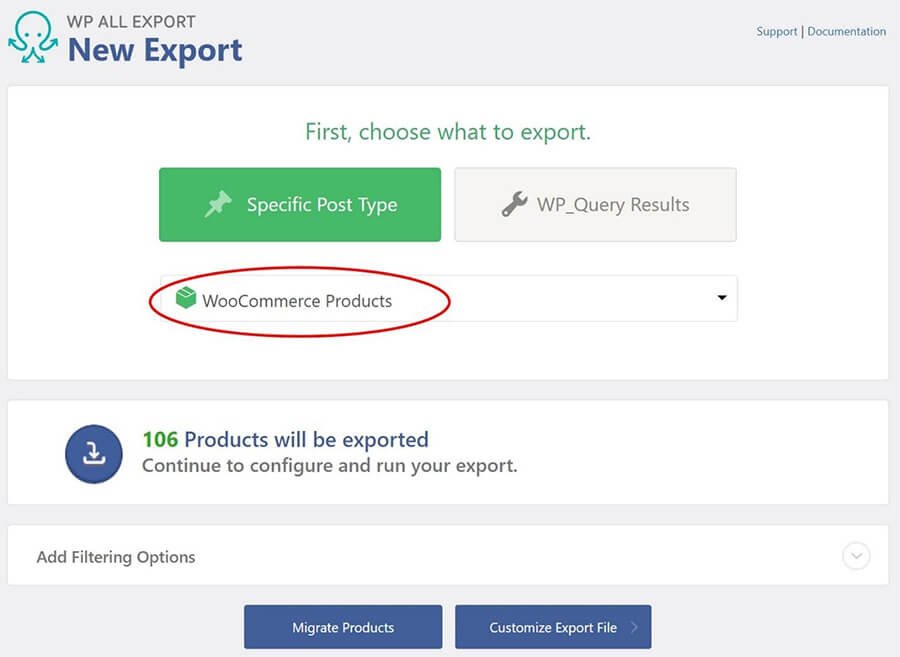
You can then apply filters using the same process that you used for WooCommerce customers, but, in this example of import/export WooCommerce data, we’re going to focus more on the output requirements.
Click the blue Customize Export File button at the bottom.
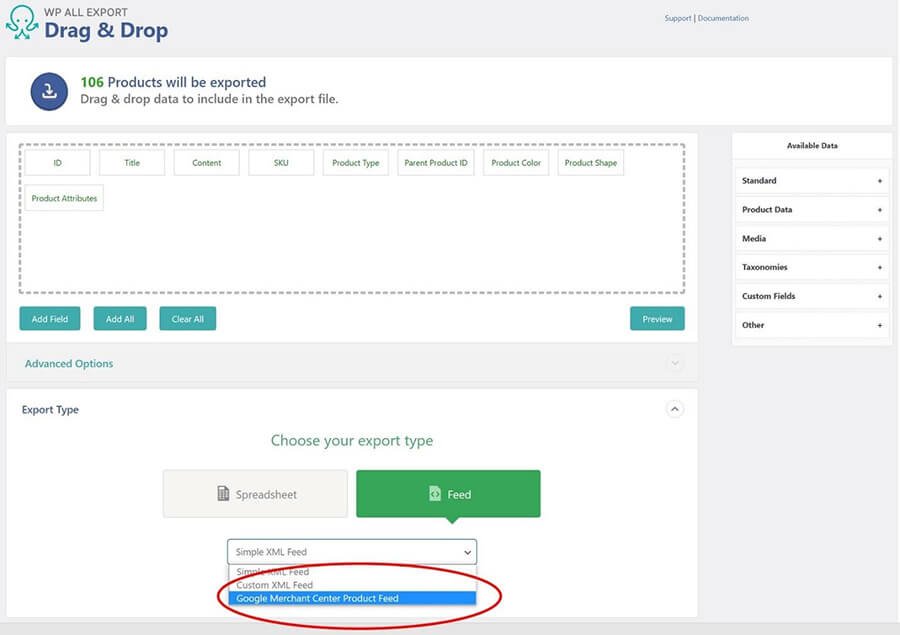
Normally, you would select your export columns in the drag & drop section of the next screen, but, to meet the requirements of the Google Merchant Center, you must instead do the following:
- Near the bottom of the Drag & Drop screen, in the Export Type section, choose Feed.
- In the selection box, select Google Merchant Center Product Feed.
Just before clicking Google Merchant Center Product Feed, your screen should look like this:
After you make your selection, WP All Export will display several new sections beneath the Export Type section. It will also open the Basic Product Information section by default:
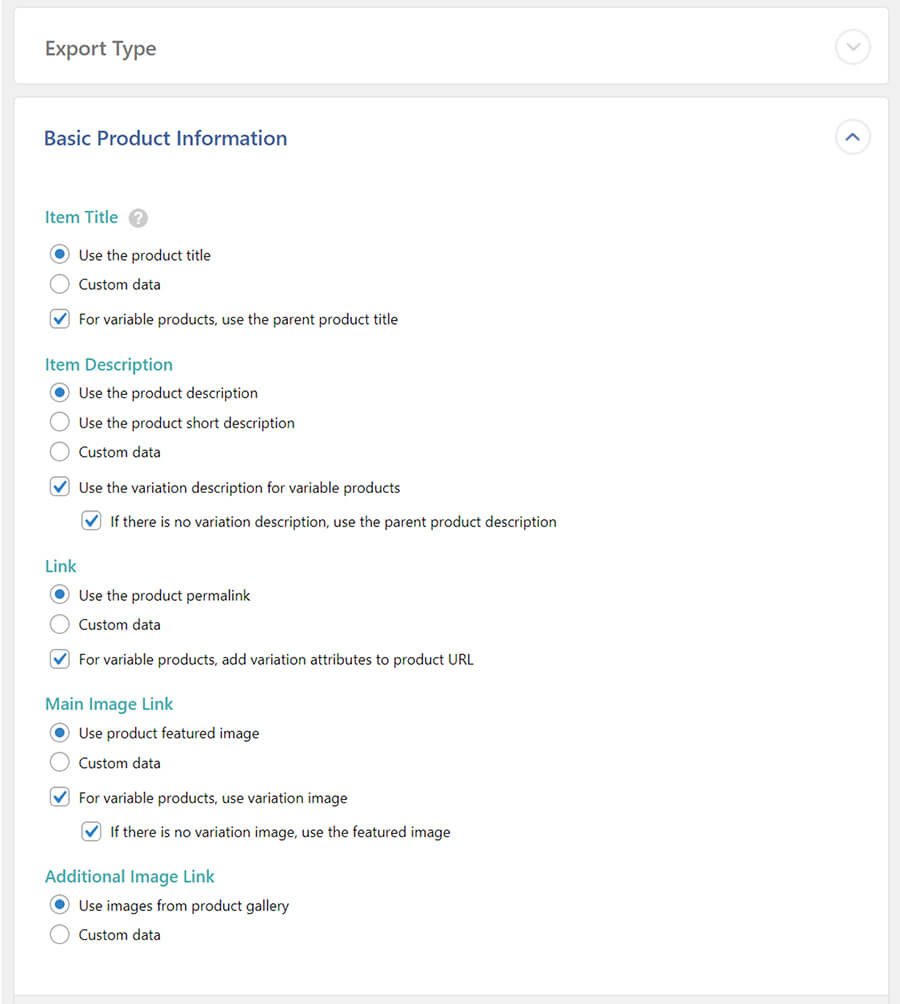
Look closely at the options in this panel, which present very specific choices for the export process. How would you manage these issues without a template like this?
Next, expand the Product Categories section, which lets you map your WooCommerce product categories to Google product categories:
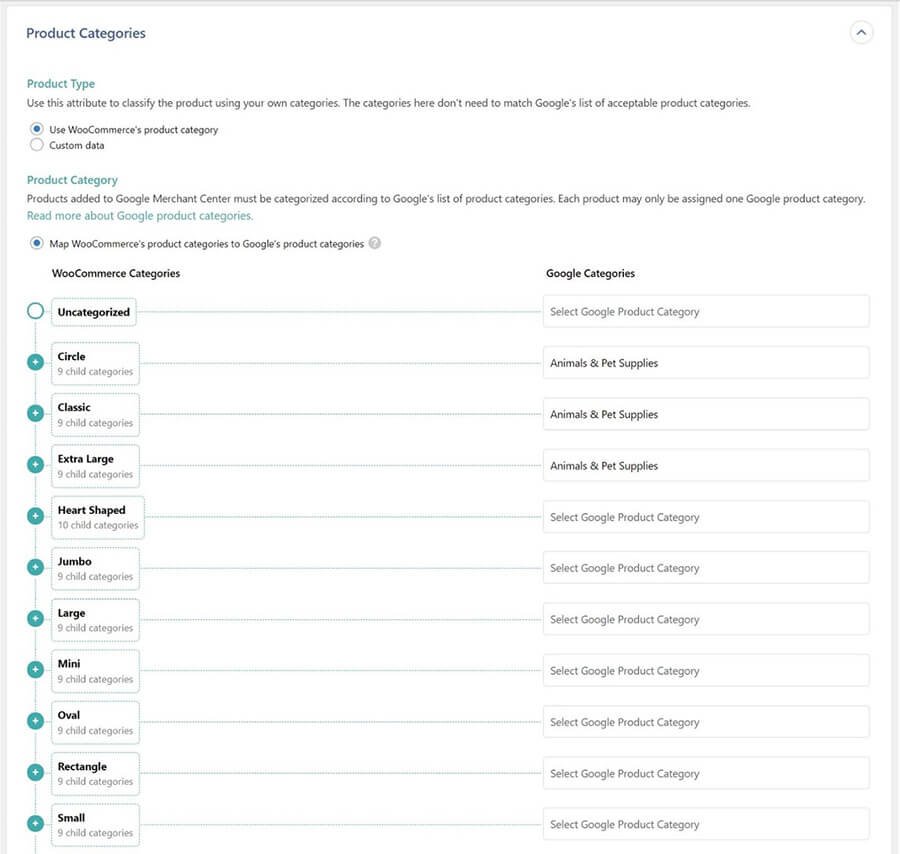
Again, how would you handle this if WP ALL Export didn’t set this up for you in advance?
The same is true for the rest of the Google Merchant Center panels.
When you finish with these panels and hit the blue Confirm button at the bottom, you proceed to the same Export Settings screen as before. But when you click the green Confirm & Run Export button, WP All Export helps you again, this time to set up your export as a URL and provide the instructions that you need to successfully upload it to the Google Merchant Center:
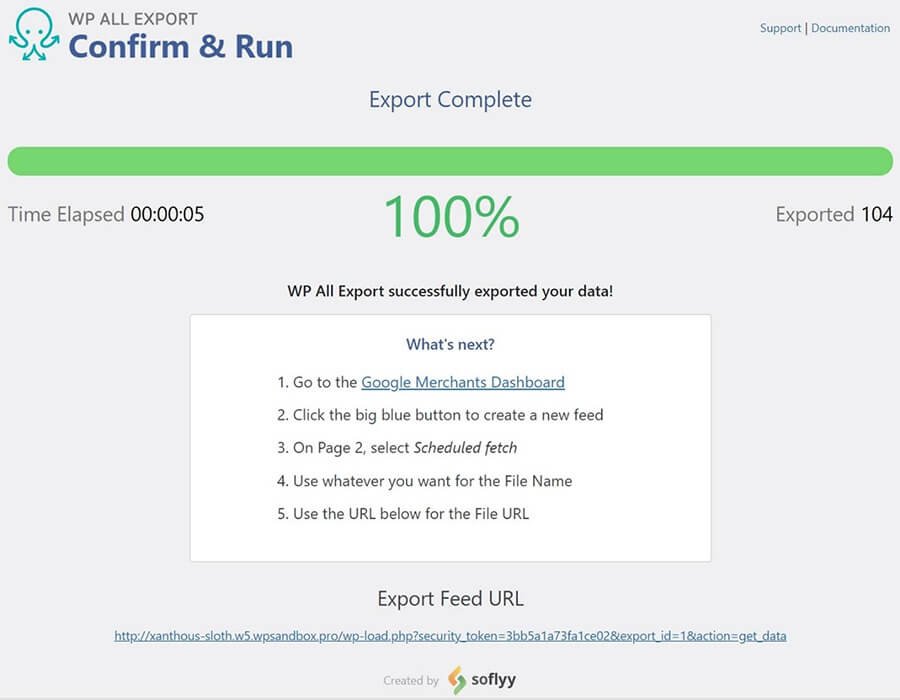
This is how you make a complicated task simple.
WP All Export doesn’t stop there, either. Other common product export scenarios include:
- Bulk editing product information. Export product data to a spreadsheet, use the spreadsheet capabilities to efficiently modify the data (including formulas, macros, scripts, etc.), and then import the modified data. The appeal of using this approach is that it is many times faster (i.e. less work) than modifying large amounts of data directly through the WooCommerce interface. It is even more appealing when you import the modified data because WP All Export remembers the settings that you used for the export, which basically eliminates any setup requirements on the import side. Of course, if you do want to intervene to handle certain aspects of the data in a very specific manner, you can do so using WP All Export’s convenient templates and wizards.
- Creating exports to synchronize product information with other sales platforms. The data requirements for those platforms will likely not be as standardized as the ones for Google Merchant Center, so WP All Export allows you to create custom CSV or XML export files to match the data import requirements of any platform.
For more information on exporting products, see Easily Export WooCommerce Products to XML & CSV.
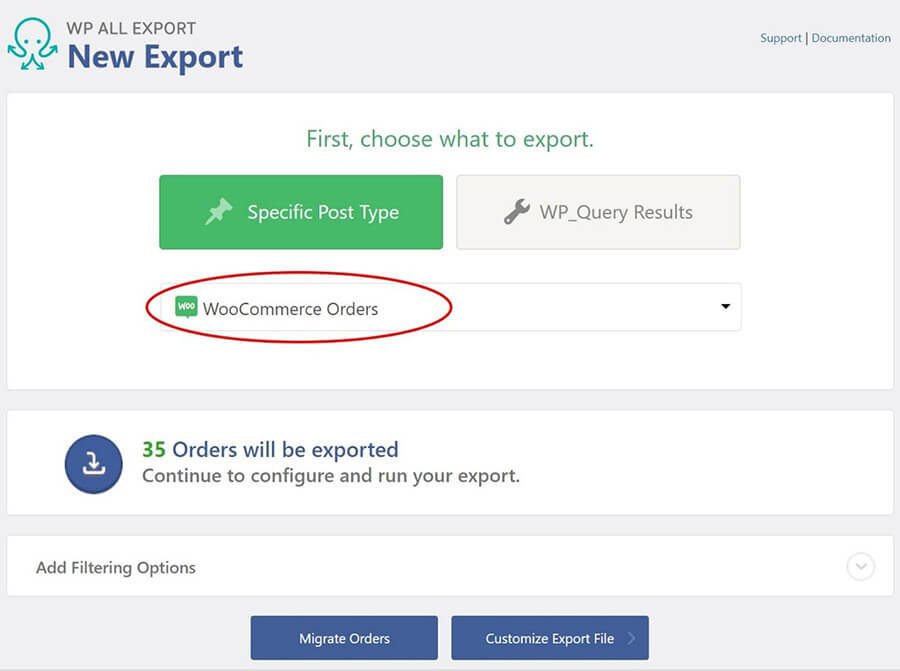
WooCommerce Order Exports
Except for the section on the Google Merchant Center, which is product-specific, everything we’ve said about customers and products applies to exporting orders, too.One difference is obviously that you must select WooCommerce Orders as the post type:
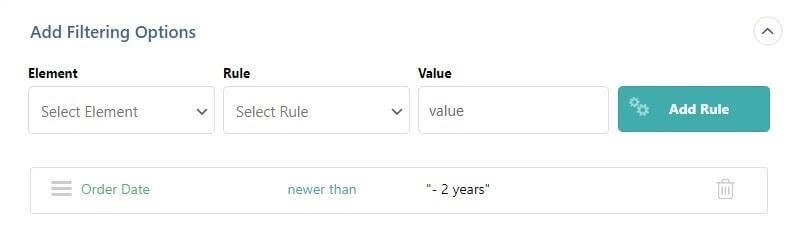
A second difference is that the dates associated with orders tend to be more important than they are for products and customers.
WP All Export’s relative date feature can be a big help with this, especially for recurring exports, because you don’t have to specify exact date filters. For example, this filter selects only those orders with an Order Date newer than two years ago:
And this filter returns orders with an Order Date that equals last month:
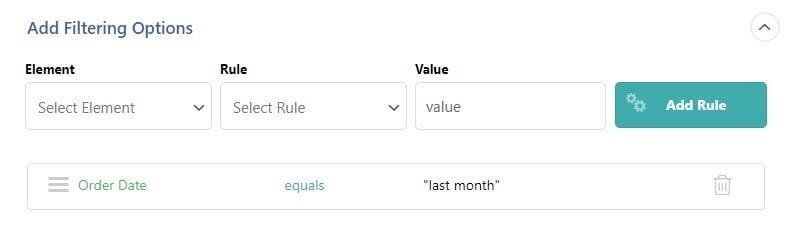
Note, this won’t return any records for the sandbox data because that data is too old, but terms like “last month” or “this month” are very common in order export scenarios, especially if you’re trying to feed accounting or reporting systems.
The accepted relative data formats can be found here: https://www.php.net/manual/en/datetime.formats.relative.php.
Another issue that you might run into with orders is that the export files tend to be much larger than product or customer export files. This can cause two types of problems:
- Most servers limit the amount of time a process can run. If a process exceeds this time limit, it will “time out”, meaning it will fail. This is needed because long-running processes might otherwise consume all of a server’s resources, causing it to stop working. To avoid this problem, large WooCommerce order exports are typically broken down into batches. But if the batch size is too big, timeouts can still occur.
- Each server typically imposes a size limit for the creation of files. Otherwise, a file might use all the available disk space. If the WooCommerce store is big enough, a large order export might exceed the allowable size limit.
Fortunately, WP All Export can help you solve both of these problems. In the Advanced Options section of the Export Settings screen, you can adjust the following settings:
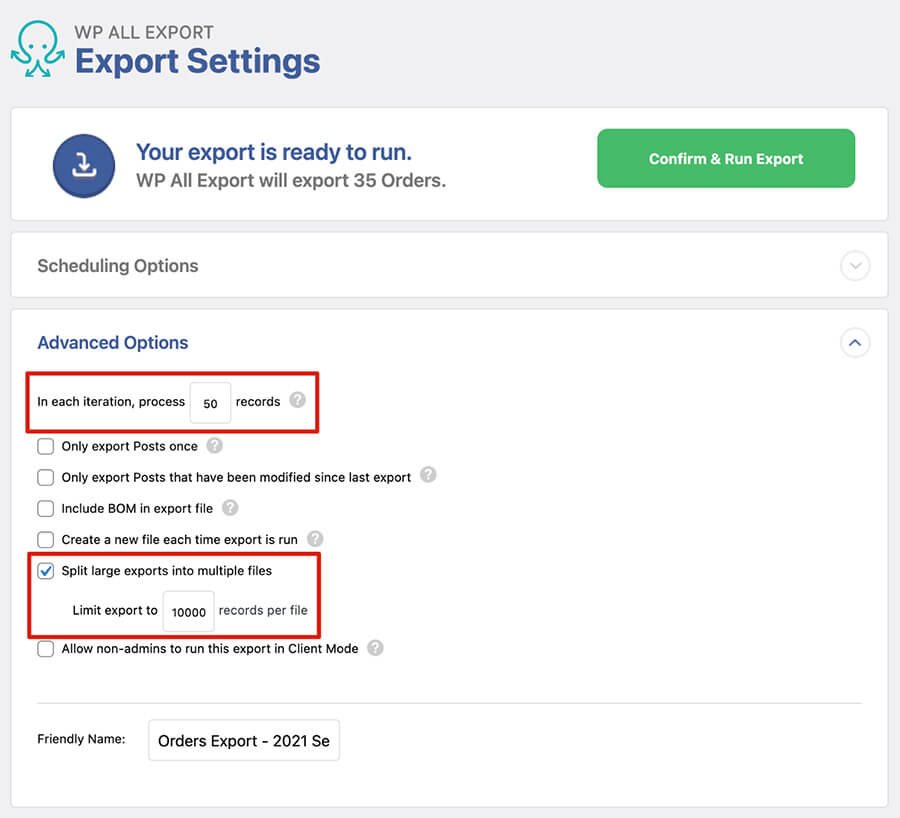
The first setting manages the batch size used to process the export. If your export process fails due to a timeout, lower this number and try again. Note, there is typically a sweet spot for batch size. If you set it too small, you will greatly increase the number of batches required to complete the export, which may slow the export down. Set it too big and you’ll get the timeout error.
To avoid exceeding file-size limits, the second setting lets you split your export into multiple files based on record counts. There is a sweet spot here, too. Set this number too low and you’ll end up with too many files. Set it too high and you may trigger the maximum file size limit.
For more information on exporting orders, see Export WooCommerce Orders to XML & CSV.